
VOL. 5, NO. 3 -- SUMMER 2003
Photographing the House, Street and Town
This begins a series of practical and philosophical articles on the
photography of architecture and urbanism.
I know you own a camera. And if you love architecture and urbanism as
much as I do, you are using it to photograph buildings -- perhaps when
you travel to European villages or Asian temples or Mexican ruins; perhaps
when you visit American cities; perhaps when you tour a new TND. If you're
an architect or planner, you're probably using it to document your own
work and the work of colleagues, to share images on a website or listserv,
illustrate a promotional brochure or monograph, or deliver a PowerPoint
or slide lecture.
The photography of buildings is an especially difficult undertaking, in
large part because perspective must be managed carefully in order for
the building or streetscape to look natural. The most common type of perspective
distortion in most photographs of buildings is called "keystoning." The
building comes out shaped like a keystone -- well, an upside-down keystone,
actually -- wide at the bottom and narrow at the top. This is what happens
when the camera back is tilted upward relative to the vertical axis of
the building, as it must be if the building is much taller than you are.
The effect is particularly egregious when you're using a wide-angle lens.
And because new urbanist buildings in particular are often situated on
narrow streets, you must use a wide-angle lens to get the whole building
in the frame.
|
|
|
|
Professional photographers of architecture solve this
and other perspective problems by using cameras or lenses where the lens
plane and film plane can be moved independently of each other. If you
have a large-format view camera with "movements" or, on your smaller-format
camera, a special "shift" or perspective-control (PC) lens, you can avoid
keystoning by keeping the film plane (camera back) parallel to the building.
When you do this the top of the building is usually cut off, but if you
simply apply some "rise" to the lens plane, the image circle shifts upward
and the top of the building comes back into view.
Such equipment can be alarmingly expensive, or, at least,cumbersome and
difficult to operate. I'll present here some strategies for correcting
keystoning using your existing point-and-shoot or basic 35mm camera, digital
or film-based. Try one or more of these techniques:
• Stand on something. I have a 26-inch aluminum stepladder with a
blue plastic top, made by Werner. It cost $34 from my neighborhood hardware
store, Stanley's. (No, you may not buy this at Home Depot, you sprawlmonger
you.) I call this excellent little ladder my "shift lens" because it enables
me to get some rise simply by standing on it. It's lightweight and I carry
it around with one hand, or leave it in the car trunk until I really need
it. True, you look like an idiot up there taking a picture, but it's a
great conversation-starter. (Security guard at the Philadelphia Naval
Base: "May I ask WHAT the hell you're doing up on that ladder?") If you
don't have a ladder or stool, look for a low wall, high curb, front stoop,
grassy knoll, crusty snow bank, or the shoulders of a large companion,
standing opposite the building you want to shoot.
• Get back farther from the building. The farther away you are, the
less keystoning there will be because you won't have to tilt the camera
upward as much.
• Get MUCH farther back and use a longer lens.
• Include more foreground. Remember, keystoning will be reduced if
you can keep the camera back closer to parallel to the vertical axis of
the building. Instead of tilting the camera up to center the building
in your scene, place the building higher in the frame so you don't have
to tilt as much. You can crop any excess foreground later.
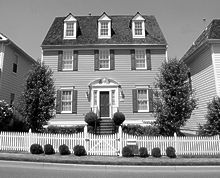
• Correct distortion digitally. In Photoshop, under the View menu,
choose Show Grid. Then under Select, choose All. Then under Edit, choose
Transform and then Perspective. You can then pull the arrow cursor in
at the lower right corner to square the building to the grid. Caution:
the shape of the building will change somewhat as you correct keystoning.
A small correction is no problem, but a massive correction will produce
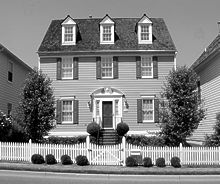
an elongated building height. Here, the first two photographs show a house
in Kentlands shot with a digital camera. The first image is keystoned
slightly because I had to tilt the camera up to get the top of the building
in the frame. The second image was corrected in Photoshop. Other image
editing programs have similar perspective control. It's simple to use.
• Don't overcorrect. Often, a little keystoning is desirable. Our
goal is to produce a photograph of a house that looks natural, that looks
something like the way we'd experience it if we were standing there. Tall
buildings (say, three or more stories) shot from close in, or houses perched
up on a hill, can look strange if the edges are perfectly parallel to
the frame. Visually and psychologically, in the real world we experience
some diminished perspective in such cases and expect it. In fact, if there
is perfect parallelism we sometimes think the top of the building is looming,
which looks wrong and even a little frightening. Many professionals, after
leveling the camera and applying rise to get the top of the building in
the image circle, then deliberately tilt their film plane slightly to
introduce a bit of keystoning.
A building that looks natural in a photograph doesn't call attention to
the photographer's technique or lack of it. Managing the keystone effect
is half the battle in allowing the building to be itself.
Sandy Sorlien is a photographer and writer living in Philadelphia.
She serves on the National Board of Directors of the Society for Photographic
Education, and is the author of "Fifty Houses: Images from the American
Road."